Tips & Tricks: Creating a Folder with Shipped and Unshipped Filters
Last week we talked about creating a basic folder. Today, we’re going to go a little deeper and show how to create a folder with shipped and unshipped filters. We will use an Amazon folder with shipped and unshipped filters as our example, but the same basic steps are applicable to other online stores too.
Creating an Amazon store folder is simple, and mostly goes through the process we’ve seen before: creating a logical condition for store type.However, in this case, it is applied to the folder (and not the filter).
Setting up the Amazon Folder
1.Create a new Amazon folder by going to Manage > Filters > New Folder.
2.Name it “Amazon Store” (or whatever you’d like).
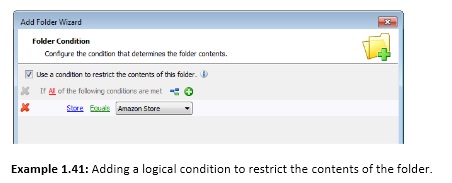
3.Check the box to enable the “Use a condition to restrict the contents of this folder”(see example 1.4).
4.Click the “Add Condition” button (then gree plus button) to add a logical condition.
5.Set up the condition to reflect the following: “if all of the following conditions are met: Store Instance Equals Amazon Store”.
6. Click “Next” and then click “Finish”.

Moving Your Folder
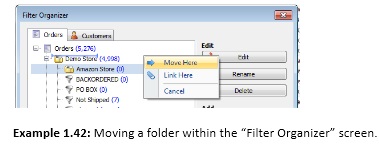
In the Filter Organizer (Manage > Filters), drag the newly created Amazon store folder so that it is right below your “Orders” filter and choose “Move Here”.

This ensures that your new folder is at the highest level and isn’t “inside of” (or being affected by) another folder (and its restrictions).
Creating Shipped and Unshipped Filters
Once we have our folder created, we can add filters. For every filter added to this folder, we do not need to add a condition to account for the Amazon Store type, since the folder imposes that condition on any filter put in it.

Creating an “Unshipped” Filter:
1.In the Filter Organizer, create a new filter (Manage > Filters > New Filter).
2.Name it “Unshipped” and click “Next”.
3.Click the “Add Condition” button (the green plus icon).
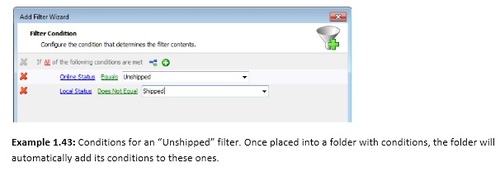
4.Change the conditions to reflect: “Online Status Equals Unshipped”.
5.Add another condition to reflect: “Local Status Does Not Equal Shipped”.
6.Click “Next” and “Finish”.
Now copy your newly created “Unshipped” filter to your Amazon folder.
1. In the Filter Organizer (Manage > Filters), right – click your newly created filter and select “Copy”. This will prompt the “Copy Filter” screen.
2. Copy the filter into your Amazon Store folder (by selecting it in the “Copy Filter” screen) and clicking the “OK” button.
Next, we create a “Shipped” filter.The easiest way to illustrate orders that have already been shipped is to create a filter with inverse conditions of the “Unshipped” filter.
Creating a “Shipped” filter:
1.Copy another “Unshipped” filter to your Amazon folder and name it “Shipped”.
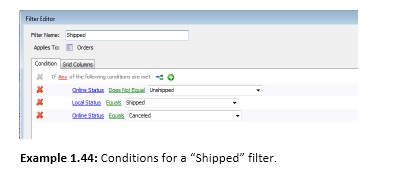
2.Change the red “All” hyperlink to “Any”
3.Change the “Online Status Equals Unshipped” to “Online Status Does Not Equal Unshipped”.
4.Change the “Local Status Does Not Equal Shipped” to “Local Status Equals Shipped”.
5.Click the “Add Condition” (the green icon) Icon to add another logical condition.
6.Change “Order Total” to Order > Online Status, and leave “Equals”.
7.In the drop-down box, type in the word “Canceled” (no quotes, spelled with only one “L”).
8. Click “Next” and “Finish”.
When you’re done, it should look like this:

The “Order Status Equals Canceled” line only applies to Amazon orders. Using this technique (copying and moving filters to a folder iwht restrictions) can be used for any online marketplace and is generally faster than creating conditions for every new filter.
Remember, you can always go back and make the changes by going to Manage > Filters> Select Your Filter > Edit Filter.
Would you like more tips and tricks about filters? Download our free filters guide.